Optical Illusions, Puzzles or Magic Tricks? Can’t tell for sure, but you better check it yourself! Image below represents just one of the puzzles you can find inside this magic post! Don’t ask me! You’ll puzzle yourself for sure… After you’ve jumped inside this article and solved more of these real life impossible creations, check ” Impossible Objects in Real Life 1, 2, 3, 4 ” and “Cube Toy”.
Both the nail and the wood are whole, yet neither of the two has been cut. Can you guess how it was consturcted?

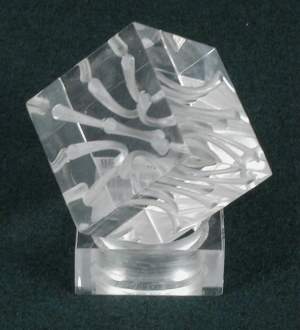
All of the holes inside this transaprent cube (except the center one) are curved. They are drilled holes, that I know for sure! How is this possible?
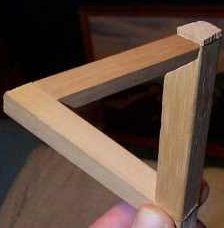
I have no idea how these two constructions could be done. Other than gluing the ring/arrow together, could there be some other solution?

![]()
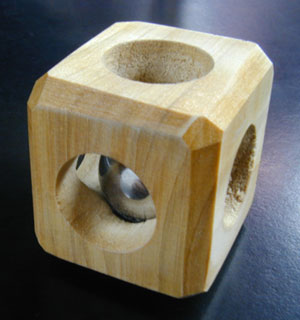
The ball-bearing is quite a bit larger in diameter than any of the six openings in the cage. There are no breaks in the cage where is could have been separated. First thing that bumoped my mind is soaking the cube in water, making it larger, then inserting the little steel ball, and after the cube shrinks back – voila! What do you think?
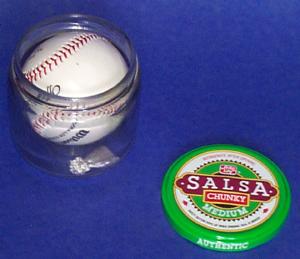
There is no way this baseball could have been forced into the jar! How did they manage to do this?!
Some other “Strange” creations:
The arrow through the hole is an easy one – I made one of these in grade 8 woodshop. You make your arrow then soak it in water for a while. Then you put it in a vise and compress it slowly … once it’s small enough, you put it through the hole and let it dry .. the wood will expand and voila!
I think my parents even still have it somewhere .. oh, the good times.
The balls inside the cages and the baseball are very easy too.
you just have to cool down the Balls as far as you can. (in these examples it must have been -20°C to -40°C i think)
but do not heat up the wooden cages or the jar (baseball)! The wood of the cages expands at heating up and so the holes are becoming smaller as they are at “normal” temperature. cooling down the wooden cages too makes no sense as well. Cause of the shrinking of the whole cage the holes are becoming smaller too.
the jar is an other problem. a hot jar and a ball of -40°C is a combination as bad as you can imagine. If you are not the luckiest (wo)man alive it will definitely explode because of the high temperature difference.
please do not try this unless you have special glass made for these forces!
ps: sorry for any grammar mistake i made. I never was good in foreign languages in school. :)
The transparent cube is also easy, another 8th grade shop project. Heat and squeeze, drill, let cool.
The plastic cube with the curved holes is easy. Made one in 6th grade shop for a keyring. You heat up the cube of acrylic in the oven until it is soft then squeeze it in a vice. Let it cool and it stays in the smashed form, then you drill your holes. Once done toss it back in the oven and it will return to its original shape with crooked holes.
Item #2 can be done using a commercial boring bit. Basically it consists of a curved tube with a shallow router bit on one end. Power transmission is done via a flexible shaft up the tube.
Debris removal is handled one of two ways; Frequent removal of the tool, or a semicircular tube. (Think of the letter “D”, with the flat side to the center of the curve)
Wood rings/arrow. Couldn’t you just carve those shapes out of a single block of wood? The pieces were never apart.
I lot of the impossable wood objects are done by putting an object in a hole in a living tree. When the tree grows it grows around the object. Later the object is cut out of the tree and the wood is carved.
It’s not particularly ingenious, but trees can grow around foreign objects. As difficult as this would be to execute, it is a possible explanation (although certainly not the best one) for any of the wooden objects.
The transparent one could be created by appropriate manipulation wit a long, abrasive bit by a skilled individual. The holes could have been “cleaned up” later with a flexible bit.
As for the ball in the cube, Split_Screen’s explanation seems reasonable, but can a solid metal ball really contract that much just by being cooled down?
“The wood of the cages expands at heating up and so the holes are becoming smaller as they are at “normal” temperature.”
actually, holes expand as well when the material they are made of expands. imagine the disc of wood that is removed to make the hole, when that is heated it expands, therefore the hole it left behind expands at the same rate.
I think you should try that.
I think the cube is actually laser etched crystal. From the angle of the photo, it’s not clear if those are actually holes or if they are just curved tubes of dots etched in the crystal.
As for the block at the top with the nail, I’m not convinced that it’s not just a notched block of wood with cut-up nail glued in place. A rotary tool can cut a nail like that, and if it were chilled, like the above steel balls, it would even shrink to where you could hide any damage to the ends of the pieces in recesses in the wood.
I made one of the transparent cubes in shop class too. Many years ago. I forget exactly, but the process is something like this: you take an acrylic cube, and heat it up so it’s malleable, and then you use a vise to compress it into some distorted shape. You let it cool while in the vise, and then drill the straight holes in the distorted object. After that you heat it up again and let it return to its normal shape.
Are you sure the holes are drilled in that lexan cube? Couldn’t it just as easily be laser etched / cut? Many small zaps, and the ability to focus the laser where ever you’d like could explain it.
“actually, holes expand as well when the material they are made of expands.”
You’re right. The holes aren’t just becoming smaller at heating up. If the wood is extremely dry the holes first stay at their “normal” diameter and expand more and more the more you heat up the cage. but the temperatures you need to get a useable diameter are much too high.
But the clammyer the wood the more will the holes become smaller (at first).
“imagine the disc of wood that is removed to make the hole, when that is heated it expands, therefore the hole it left behind expands at the same rate.”
clearly, the wood you removed would expand too, if you hadn’t removed it. But now there is no counterpoise (is that word right?) for/to/on… (?) the cells around. (previously-)Living materials do not act the same way as metal or stone. In some cases (somthing like this) it acts totaly different from any other material.
Could the nail have been inserted as a rod of soft metal, then the head formed in situ?
wizards did it!!!!
On that transprent cube the probably used a dremel tool with a bending attchment. no tricks there
The final project appears to be photoshopped. Take a look at the “top” edge, amongst other things.
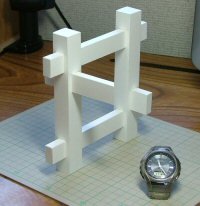
I figured out the second from the last one ,it appears that 3 horizontal peices of wood/plastic connect 2 vertical ones,but really only 2 connect them ,the middle horizontal peice of wood/plastic is only atached to the left vertical one ,for proof look at the shadow in front of it ,it points tward the watch ,a simple matter of camera angle which is why (as complained about in a previous “impossible objects”page) pictures from different angles could not be found
I have actually seen for real one of the pieces of wood with the nail through and the instructions explicitly said the answer was NOT that the object had been left with wood to grow around it. It’s always puzzled me though…..I wish one of you had told me how they do it!
Nail thru wood puzzle. First of it isn’t a nail it’s a screw. And I’ve been scratching my head trying to figure it out. It really annoys/intrigues me, that I can’t figure it out. I think we’re all overlooking some simple fact and in the process of figuring it out – making the solution over complicated. There must be a simple solution. I don’t think the puzzle maker have the time to wait ten years for the tree to grow around the screw. That wouldn’t be profitable. No, he has some simple solution we’ve overlooked. And I don’t think the solution is to cut out different blocks of wood and gluing them to place – then it wouldn’t rank as a puzzle.
I’d wish the image was of a better quality – that might give us some more clues. Does anyone know where I can find the original image or just someone who sells the puzzle?
About the ball in the wood box.
I think the easy way to put a metal ball inside of the box is growing it inside. You just need a small ball to start from (one that fits the holes in the wood box) and then usin electrolisis, you add layer and layer of metal to the ball. Sure the ball will have a electric rod atached to it, but is easy to cut and polish the ball.
About the cube with bended holes.
Noboody said you start with a cube. If you just get a ball of acrillic, then make all the holes you want, then melt it just a little, then bend it. And after it cool down, just cut the cube shape out of it. And that way the center hole is straigth. It was in the middle of the original ball.
Screw on wood – who says it’s a complete screw and not 3 pieces ?
The nail in the wood is done using a straight grained wood such as bass wood. First you cut the notches in it as shown. While the wood is still green you steam it over water and bend the “head” end down far enough to drill a hole thru the center “blocks of the notches.The trick is to make the hole big enough to let the nail slide back and forth.Then put the nail in and let it bend back straight and dry. It does take a little patience but it does work.
the baseball in the salsa one.. alrihgt well you freeze the baseball then you put the ball on top of the jar put like a heavy book and sit on it. it will eventually go through… but you can’t get it out.. yeaaa.
uh, carlos, it says right @ the top of the puzzle that neither of the objects are cut(that means the nail can’t be 3 pieces, smart one)
So…what is the real answer to the nail through the
slots. Do you soak the wood, and for how long.
I would like to see if somebody could build one of the nail in wood things out of aluminum or something to prove to me that it is not just soaking the wood to make it squishy.
my grandpa puts together and builds al kinds of crazy things like that i’ve only been able to figute 1 out
Ok this might have nothing to do with the objects, but i REALLY didnt know that water could shrink things!
…that the ‘screw’ or ‘nail’ is actually a NAIL. YEAH, I said it. Its a NAIL. What you are seeing are rings (siding nails/specialty nails have them) not threads. Its an optical illusion IN and optical illusion.
the baseball is easy the piece of foil or what ever it is was on fire for instance take a bottle with a mouth that is slightly smaller in cercumference than an egg and take a piece of paper light it on fire then place the egg on the top and it will get sucked in with out breaking to get it out insert a straw and turn it upside down and blow in to the straw ant the reverse will happen
the salsa one must have been hammerd in there…there is no other explanation…the coin ones are cool…but i have to say one thing…these are singes…sings saying…..“THE FARIES ARE COMMING!!!!!!!”
=^.^=
it’s easy the baseball one,,,, when you heat the glass it gets bigger……try putting an egg inside a wine bottle
Used to Make the Square Wooden Boxes with the Ball Bearings in High School and sell them. The hole is not that much smaller than the bearing. You have to use wood that is not cured yet and still quite wet. After making the Box and Drill the Holes you put the Box down in Boiling water and let it sit for a few minutes. The ball will push through. Then let the box sit in the sun for a few days in a good hot spot to dry them out quick and then sand them. Used to sell them for $10 to raise money for our football team.
Screw thru wood is curved surface at the end, allowing screw to miss end piece. baseball in jar: heat jar to push ball into opening.
On the transparent cube, some curved pieces of rubber could be inserted by by cutting the cube in half and putting them in. They just LOOK like holes. Then the cube is glued together with some kind of invisible glue and it’s finished.
hey i’m in 8th grade and i made one of those plastic cubes with the curved holes in tech ed like a month ago, you do exactly what dustin said, and no it’s not ecthed crystal:)
love ’em
Forrest dude, do I know you? (CMS much?) About the thingies, the nail, That wood looks too hard to bend it without breaking it, no matter how boiled it is… and who says that cutting is the only way to do something, mebbe the person thingie BURNED a hole through it… it’s possible! And personally, my first though was ‘wow, poured a bunch of hot glue into a mold, and then took it out….. special…..’ Cool effect though.
the first one is real easy-
look at where the screw enters the hole, the hole is larger than the screw. So it was just soaking the wood in water, drilling a hole through the teeth, and putting the screw in head first through. Preschool work.
Another way would be for the back portion to be either photoshopped or easy to take off, but no visible lines that i noticed. anyone think i’m right?
The only one I looked at so far was the first one. This one is easy…
The hole was drilled from where the bottom of the screw is, wide enough for the head of the screw to fit through. Then the screw was slipped in through the holes, head first, and laid to rest inside the block for the picture to be taken.
I think the third and fourth ones (the two rings and the arrow and ring) were made by carving both of the two objects from one peice of wood.
the cube crystal is very easy to make… it´s by laser engraving!
i work on crystal laser engravings…
;p
Err… about the baseball: I’ve hard heating the jar to 50 deg C, freezing the ball… how about just: let the air out of the ball, push it in, pump it up?
hehe good point, anonymous. thats what i would do! im 13 n id just like 2 say… ur all making it boring! these tricks are amazing, leave them like that. why do we have to explain everything??? can’t you let one little thing go as a mystery??? i am calling myself clam incase anyone wants to reply to my comment.
duh! Fakes. I know how to solve each and every one.Think behind what they would expect you to think. Focus! The clues are to take you some where in space.That handicap code I have to do has the word SEED in it in order. Weird.
hey, about that screw in the wood, the screw can be anything to a nail to a metal rod, i’ve seen this same puzzle pop up in various places, one version had the screw only go through 3 sections of wood. ya would think shrinking the wood be logical, but i’m pretty sure it is a cleaver technique rather than a method. Think more of the tools used, joiners, wood-workers.But for now we just dun know?
The first one is pretty simple, once you think of it. Carve the notches in the wood, and drill a hole slightly smaller than the head of the nail through the three notches on the right. Soak the wood in boiling water, and the holes will widen and soften enough to insert the nail head first. Let it dry, and your finished!
The one with a nail through it is quite simple. If the block or whatever it is, was BIG, then you could easily hammer a nail, or screw, through it. Then when the guy takes a picture of it, he takes it from a point of view that makes it smaller. Simple.
“Err… about the baseball: I’ve hard heating the jar to 50 deg C, freezing the ball… how about just: let the air out of the ball, push it in, pump it up?”
… Baseballs aren’t inflated. they are a ball of string wrapped in leather, and the leather is sewed together.
About the nail in the wood.
I was visiting Tasmania and just bought one of these in Scottsdale visitors center. A guy from Mole Creek makes them. The instructions say the puzzle is to figure out how he did it. There was no bending or breaking of either wood or nail.
Here’s a link to an article about it.
http://www.news.com.au/mercury/story/0,22884,20465928-3462,00.html
If the link doesn’t work, google “mole creek puzzle”
its easy, i saw the video for this trick…….
the ring and the coin:
easy- if there was a gap in the ring that was just larger than the thickness of the coin, it could easily be hidden behind the coin, yet the coin could slip out with no problem.
the last object (triangle thing):
also easy- the right (vertical) segment has a notch cut at the top that is just the right size and angle so that, at this camera angle, you can see the top left pice through the notch. notice that the corner of the right piece where it “meets” the top left piece, is rounded – it is worn or sanded by accident.
thats a millipede sniffing its AR’S!!!
you guys and girls are computer geeks the worst kind i cant believe you’d waste yor life commenting on an internet site what a waste of time do you guys have lives?
Ya realize that you are commenting on a website too, right???
Most people who make comments like this are really just trying to make themselves feel better about the crappy lives they themselves lead. Which is no different from the crappy lives everyone else in the world has. So, just admit that your life sucks and we are all in it with you, and everyone will be happier.
The real question is… How is it possible to get the nail out of the piece of wood. Now if somone can tell me that, your the real genus!
SLEDGEHAMMER. HAPPY?
NAIL IN WOOD
the nail does come out of the wood. the nail is not bent or joint or moulded or cut etc
the wood is not cut or joined or broken or glued etc.
the wood is one piece the nail is one piece, the wood is real wood and the nail is a real nail, the nail doesn’t have to be a nail it could be a small wooden pencil!!!
the answer is not rocket science, but it does take a little thinking, not tones however.. i did not take another look at the item for another year and 1/2 after i bought it but one of the things i thought at the first time i got it was right.
i have not actually done it but the way i think is right because i have confirmed with the maker here in tasmania
i know how these are done i have been doing these and other wood illusions for 30 years.ripleys in orlando florida have bought my illusions .to see my work and other illusions go to the http://www.americanwoodworker.com see dusty miller and see my work you will be amazed as millions have in the past.my nickname is woodini see why they call me that.enjoy my work.[img]undefined[/img]
My dad used to have a woven wooden basket made of interlocking pieces. Looking at it, you’d say it had to have been carved from a single piece of wood. However, one of the pieces was made of a different kind of wood from the rest. My dad knew a lot about wood and recognized the kind of wood odd piece was made of. When soaked in water, that one piece became very soft and pliable, almost like a sponge. It could then be squeezed and bent and released from the other pieces, allowing the bowl to be dismantled.
the nail in the wood are made by A Touch of Craft at Mole creek in Tasmania. He uses either nails, screws, pens or pencils throught the wood and they are all just as impossible to do. I have one and the wood is not joined and the nail is not bent!! Please someone tell me how to do this. Ssys that the wood is not steamed or twisted or bent and the nail is not cut and joined.
someone that was very angry just shoved alot of things into jars and cages, that’s how you do it.
;)
the last one is photoshoped.
The cube with the ball is easy. First, the holes are slightly slanted inwards making it easy to go in but tough to get out
i saw something like this before. an arrow was shot at a glass jar and got stuck in the middle, and it diddn’t make a crack or anything, and the answer to do it is locked up in a vault.
the last one isnt photoshopped…and it isnt even a triangle either, its hard to explain in words but i’ll try.
its a rectangular block with two similar blocks nailed on either end at a 90 degree angle…then its lined up and photographed with some fancy angle work and Viola!
great illusion, not so great as a display-able object in your home.
If your having trouble visualizing what I just said…look up a copy of the children’s book “Walter Wick’s Optical Tricks” and in the back, it explains this trick
The arrow/ring and coin combo is done the same way the marble/stone lions with the ball in the mouths in front of chinese restaurants are made. It was carved from one piece of wood, and not seperated until the final moments giving the illusion that it was somehow inserted, when it was in fact one piece made to look like two by seperation at the end.
I work at the Forest Eco Centre in Tasmania and we sell the nail through wood puzzle. It can be anything from a pencil, nail, screw even a large spike about 20cm long.PLEASE SOMEONE TELL ME HOW IT’S DONE!!!!!
The screw one is easy, the last colum is not like the rest it’s just shaped like them, you can take the screw out from the top.
the last ones easy…well i think so!
the length of wood that is the confusing part is not wood is maybe paper etc. you can tell from the shading of it and whatnot.
the one with the baseball in the jar is sooooo easy! We have one of these at home. It just a regular ‘stress ball’ (don’t know if it’s called the same in english), you know, one of these foamy balls you’re supposed to sqeeze (and not to throw at your boss as many others do). It’s made of plastic. And the last one is just about shooting angle, just like many others of these.
is it just me, or does one side of the triangle in the last pic look photoshopped?
It hasn’t been photoshopped. It looks like it’s been photoshopped because those two parts of the triangle are not connected and only look connected because of the exact angle from with the picture was taken.
before you insert the screw through the wood soak the wood and squeeze one end flat with a vise. screw in your screw and resoak and let dry. there it is!
Hi all, I have one of these wooden blocks with a pencil through it in front of me – it comes from a shop in New Zealand and is called “the mole creek wood puzzle”. The wood is a solid piece and the units have anything from a nail, a screw/a pencil thorugh it. The instructions when you buy the item state – “wood not steamed/bent or twisted – pencil/screw etc is not cut and joined – wood is one solid piece throughout the process.”
lateral thinking involved.
I cannot figure it out and I have had it for 2 years.
the last one is probably the easiest to execute, technically.
there’s the vertical piece attached to the two pieces attached at a right angle.
at the top of the vertical piece, a notch is cut to accomodate the farthest piece visually.
they glued a cap piece onto the vertical piece to give it a square top…
its probably easier than taking the time to photoshop it…
the one with the coin and the arrow is soo easy 2 guess !! the coin is wooden, and so is the arrow, so when a person was making the “coin” ande the arrow, he used the same piece of wood for them !! voila !!
I hated it
I actually know how both the ring around wooden arrow and wooden and metal ring are done.
I work in a forge you see,
quite simple the wooden objects will haveeasy peel heat proof covers and a mold will be placed around them (not touching them) and the molten metal will be poured in left to cool. and then the mold is taken off and the easy peel heat proof covers too and there you go you have an amazing little object.
the other one are beyond me though
Damn you wooden puzzle!! I’m sitting here with the Tasmanian screw puzzle, and I can say almost for certain that there IS NO SOLUTION. Whoever built this thing was very smart at covering his tracks, because there’s no way this screw was not bent or the wood wasn’t twisted…no way. If anyone wants to prove me wrong, please do so…I’m dying to figure it out…
Here is the solution to the very first wood trick with the screw, nail or pencil through the wood (it is done with all of these).
After research on the web, and searching through pages and pages of forums, I found the answer.
Here is the link so you can read it yourself. It is in Posts #79 and 80. Quite and interesting read to see all the woodworkers trying to figure it out!
Hope this gives some of you more sleep at night!
i guess all of you who are still puzzled by the nail through the wood have not read the post by trina. look up mole creek puzzle(nail through the wood puzzle) on google. here is the link http://hard-puzzles.blogspot.com/2008/01/mole-creek-wood-puzzle.html read the post by alan.
his explanation is the best, probably correct, and only answer to the puzzle. he is saying that a small tree is drilled to have a hole that will fit the nail into the tree. then the tree is allowed to grow for several years. by that time the tree will have grown around the nail. then the puzzle maker just has to cut around the nail to make the desired shape of the puzzle.
The wood puzzel: you boild one side of the wood, then you can bend it a little, drill a hole and put the screw in or whatever you want. The you reboil the wooden side and make it straight again. Its the same principel as when they make wooden boats :)
Good God, i hope your not in the navy……
I KNOW! THEY MUST HAVE JAMMED A NAIL INTO THE WOOD WHEN IT WAS STILL GROWING, THE TREE WOULD HAVE GROWN ALL OVER IT, WHEN COMPLETELY COVERED, THEY CUT IT OUT, AND ITS DONE!
OK people, im tired of arguing with these old outdated posts’ because nobodys replying so here goes…
“ITS NOT A NAIL ITS A BLOODY “SCREW!!!”
All the wood ones are done in a similar fashion… The wood is soaked in hot water, and then is compressed in some way. When the wood dries out, it returns to it’s original shape.
For instance with the nail through the block of wood. The wood is cut as shown in the photo, and then soaked in hot water. When the wood has become saturated, the first “tooth” at the end of the wood block is compressed in a vice and allowed to dry out. The block retains the compressed shape, allowing the nail to be pounded in beginning with the second “tooth”. Once the nail is through all the other “teeth”, the block is then soaked again in hot water, and returns to it’s original shape and dries out.
The plexi-glass one is done the same way… the plexi-glass is heated and compressed. Then the holes are drilled. The plexi is re-heated and returns to it’s original uncompressed shape, which creates curves in the drilled holes.
Arrow through coin: soaked wood, compressed arrowhead, put through coin, and then re-expanded… not so sure about the ring through the coin.
The ring opens up like on of the rings magicians use. Simple if you only think, I say.
one of*
for the curved holes you just need a curved drill.
heres my solution to the colorless plastic cube: it was a heated plastic mass, the holes were drilled while it was warm and then place on a circular object that was smaller than the plastic mass –> the plastic bent downward, on the side, which leads to the curved drill holes. then the mass was cut into a cube.
the metal box in the wood cube: simple. freeze the metal ball–> its volume decreases.
OH MY GOD PEOPLE !! ARE YA ALL 12?!?
PHOTO…..SHOP!
i made on of these in the 9th grade its made of a special plastic that has a memeory you cut it into cubes….heta the plastic until its very soft then press it in a vice and squash it then drill the holes and then reheat in an oven and the plastic returns to its former shape the middle hole stays straight because it was squashed straight but the others bend back inwards when it goes back into a cube resulting in bent holes
the nail could be a part of the wood.
FOR THE COIN TRICK
You to pass the tree branch through the coin hole. Wait for the branch to grow. Cut and carve the arrow or whatever. You culd also make a graft if there weren’t enough irrigation.
Ok. Stupid. your growing tree branch would split the flippin coin before ye carved it!Look at the size of the arrow head and feathers numb nuts!
to the person who said “you are computer geeks, how do u have time to comment on this stuff, get a life, ect.” y were YOU on here is the question if u think its sooo dumb. hmm?
the ball in a wooden cage ? cool the ball so it shrinks , then soak the cage in water ??
the mole creek wood puzzle – i have made one recently. some people have the right idea, but try your ideas and you will find out that they are not quite right. remember the instructions tell you what the wood hasnt had done to it, so ask yourself what has been?
ok i kno the last pics r illusions but i wanna kno how on earth did they fit the items in the first few
To the second anonymous: If you think we’re computer geeks, why r u posting? Idiot
The curved holes in the plasticis not an illusion. I have one of these on my desk that I made in 8th grade shop class. You heat a plastic cube and then squish it in a vise. Cool it and drill the holes. The reheat it and it will go back to its original shape. The holes will curve as they stretch.
The wooden block with the nail in it is made by soaking one end of the block in hot water and then clamping it down,drilling your holes,and putting the nail in then allow to dry. It will expand to it’s original shape trapping the nail inside. I know this because i saw the guy on the woodwright shop make this. And the wooden arrow through the hole was made the same way.
Last of two figures could be made in real. The trick is point of view. For most figures of this type could be found at least one position where from you watch real object like on the picture. Just cut it as require and you got it.
Like Gordon, I made one of those plastic cubes in middle school shop class. Mine didn’t come out quite that pretty, but I wasn’t a gifted driller. Now I work with plastics every day at work, and most people are shocked at the things we can do with them. With the right kind of plastic and the right technique, you can make *anything*. (We regularly replicate bird feathers that you can’t tell aren’t real by touch or sight.)
ok ivan…. time to come out of your vodka drunken stuper!
That’s amazing and i was also wondering the same that how could they manage to do it but i am sure that the last two pictures are more like illusion than some great piece of work…..
The wooden solid block puzzle is easy.
The screw is inserted afterwards, in three pieces, the center one first, then the left, and then the right (head).
The last object is straight out of an M.C.Escher portfolio. Similar to a piece of his work titled “Tower”.
all of that wood is boiled to make it soft
the glass cube it filled with water making the holes look bent from certain angles. i know cuz i observed an aquarium of fish with the same effect. (and the occasional duplicate objects which are actually one.) the wood cube actually has holes larger than the ball and the coin with the hole and arrow actually has a smaller hole than the arrow (both made “impossible” by viewing from certain angles) the ring has a slit (hidden by the coin)and the nail is actually a screw (not one…but 2 to 3. it won’t it the gap if it were one large screw.)
and by “it the gap” i mean “FIT the gap”
oh. and btw…they really did force the baseball there. i tried that once with a ball of the same size and a (SMALLER) hole. the only thing that’s impossible is actually forcing the thing out without touching the jar.
i hate to say it lol but you are wrong on almost all accounts =]
Gotta jump in here because I made one of those “glass cubes”. It can be done with a certain kind of plastic and a bit of heat. Heat the cube, compress it with a vice until it cools. You get a short cuboid with the excess matter bulging out the sides. Drill the holes while it’s in that state. Then heat it again and it uncompresses. Allow it to cool uncompressed and you get the curved drilled holes.
i hate this website and i never want to go to this website ever again
The first one’s holes are big enough to get the head of the nail through, so the nail has been put in backwards
it’s just from one big piece of wood, carved into two pieces.
The interconnected rings are carved in situ from a single block of wood. the base ball is done by softening the ball and forming a vacuum within the jar – sucks it right in.
I’ve done the baseball in the jar, only with an egg. heat some water in a salsa jar to get it steaming (the jar will expand some) and “cork” the jar with the baseball. As the steam in the jar cools it creates a vacuum and sucks the ball in. It is less likely to deform with a vacuum than when pushing it in.
The optical illusions are cool. They are actually objects that were painted with the optical illusion much like the 3d sidewalk chalk artists do.
Steel ball in the cube — i agree, cool the ball, you would be amazed how much you can shrink it.
The picture of the baseball inside the salsa jar was created by harry Eng. He was world known for making Impossible Bottles. I know because I’ve not only made this exact bottle but I’m following in Harry’s footsteps and have been making and selling my Bottle Magic bottles for 13 years to customers all over the world.
Would love to have you go and check them out at http://www.BottleMagic.com
Always be your best,
Jeff Scanlan
Creator of Bottle Magic
you can use a ‘soft’ nail and bend it……